Monday, September 3, 2012
Membuat jaringan LAN antar 2 Komputer
Membuat jaringan LAN antar 2 Komputer
 Kali
ini gw mau coba nulis cara setting ” lokal area connection ” antar 2
komputer, hahay mudah2an tulisan gw bener pas elu praktekin
Kali
ini gw mau coba nulis cara setting ” lokal area connection ” antar 2
komputer, hahay mudah2an tulisan gw bener pas elu praktekin 
- gw berharap elu dah siapin kabel buat nge-LAn
- elu juga udah ada 2 komputer yang mau di LAn
- kalau elu pake Windows XP,buka Control Panel »»
Network and Internet Connections »» Network Connections. - elu pake Windows 7 atau Vista, buka Control Panel.
Pada icon Network and Internet,
klik tulisan View Networks Status and Task. - Selanjutnya akan muncul jendela Networks and Sharing Center.
Pada sisi sebelah kiri jendela ini,
klik tulisan Change Adapter Setting - Klik kanan pada Networkd Card Anda dan pilih properties.
- Pada jendela Local Area Connection Properties,
pilih Internet Protocol (TCP/IP) pada Windows XP
atau Internet Protocol Version 4 (TCP/IPv4) pada Windows 7 dan Vista.
Kemudian klik tombol properties. - ada jendela properties yang muncul,
pilih opsi Use the followinf IP Address dan isikan dengan 192.168.0.1
pada IP Adrees, 255.255.255.0 pada Subnetmask.
Input yang tersisa bisa Anda kosongkan. - Klik OK untuk menyimpan setting dan klik tombol OK juga pada
Local Area Connection Properties
kalau elu mau ada hubungan khusus antar 2 komputer layaknya suami istri caranya adalah sbb:
- Untuk pengguna Windows XP, bukalah system Properties dengan
mengklik kanan icon My Computer dan pilih properties.
Anda juga menekan tombol kombinasi keyboard Win + Break. - Bagi Anda pengguna windows 7, caranya sedikit sama yaitu
buka system properties dengan cara seperti pada windows XP.
Pada jendela yang muncul klik tulisan Change Setting pada bagian
Computer name, domain, and workgroup setting. - Pada jendela System Properties, baik Windows XP,
Vista ataupun Windows 7, klik tombol Change. - Di jendela berikutnya berikan nama untuk komputer 1 dengan nama yang diinginkan.
Misalkan DK-1. Dan berikan nama dari workgroup Anda. Contonya Dunia Komputer.
konfigurasi Network Card dan merubah nama komputer serta workgroup pada komputer kedua. Namun, bedanya pada komputer 2, IP address yang diberikan adalah 192.168.0.2.
Subnetmask sama yaitu 255.255.255.0. Sedangkan Nama komputer harus berbeda. Misalkan berikan nama DK-2. Namun, workgroup haruslah sama.
Untuk mengetahui apakah kedua komputer tersebut sudah terhubung
lakukanlanh ping dari komputer 1 ke komputer 2 atau sebaliknya. Caranya sebagia berikut:
lakukanlanh ping dari komputer 1 ke komputer 2 atau sebaliknya. Caranya sebagia berikut:
- Buka Command Prompt dengan menekan tombol keyboard Win + R.
- Pada CMD ketik perintah “ping IP Address”.
Ip Addrees diisi dengan IP komputer yang ingin di ping.
Jika Anda melakukan ping dari komputer 1,
maka IP address diisi dengan IP komputer 2.
Begitu juga sebaliknya. Contoh perintah ping dari komputer 1 ke komputer 2
Contohnya : ping 192.168.0.2 - jika koneksi antar kedua komputer tersebut berhasil maka hasilnya akan seperti ini:
Pinging 192.168.0.2 with 32 bytes of data:
Reply from 192.168.0.2: bytes=32 time<1ms TTL=128Reply from 192.168.0.2: bytes=32 time<1ms TTL=128
Reply from 192.168.0.2: bytes=32 time<1ms TTL=128
Reply from 192.168.0.2: bytes=32 time<1ms TTL=128
Ping statistics for 192.168.0.2:
Packets: Sent = 4, Received = 4, Lost = 0 (0% loss),
Approximate round trip times in milli-seconds:
Minimum = 0ms, Maximum = 0ms, Average = 0ms
4. Jika hasilnya seperti ini:
Pinging 192.168.0.2 with 32 bytes of data:
Request time outPinging 192.168.0.2 with 32 bytes of data:
Request time out
Request time out
Request time out
Ping statistics for 192.168.0.2:
Packets: Sent = 4, Received = 0, Lost = 4 (100% loss)
Naah…Berarti kedua komputer tersebut belum terkoneksi.
Cobalah memeriksa apakah kabel sudah terhubung dengan benar atau
mungkin saja ada kabel yang putus.
Sekian dan terimaksih….:)
Saturday, September 1, 2012
Hash Kracker
| About Hash Kracker | ||||||
|
||||||
|
It uses dictionary based cracking method which makes the cracking
operation simple and easier. You can find good collection of password
dictionaries (also called wordlist) here & here Though it supports only Dictinary Crack method, you can easily use tools like Crunch, Cupp to generate brute-force based or any custom password list file and then use it with 'Hash Kracker'. Hash Kracker is fully portable tool and also comes with installer to support local installation & un-installation. It works on wide range of platforms starting from Windows XP to Windows 8. |
||||||
| Features | ||||||
| Here are the main features of Hash Kracker | ||||||
|
||||||
| Installation & Un-installation | ||||||
| HashKracker comes with Installer to help in local installation & un-installation. This installer has intuitive wizard which guides you through series of steps in completion of installation. | ||||||
| At any point of time, you can uninstall the product using the Uninstaller located at following location (by default) | ||||||
| [Windows 32 bit] C:\Program Files\SecurityXploded\HashKracker [Windows 64 bit] C:\Program Files (x86)\SecurityXploded\HashKracker |
||||||
| How to use Hash Kracker? | ||||||
|
It is very easy to use tool for any generation of users. Here are simple steps |
||||||
|
||||||
| Screenshots | ||||||
| Here are the screenshots of Hash Kracker | ||||||
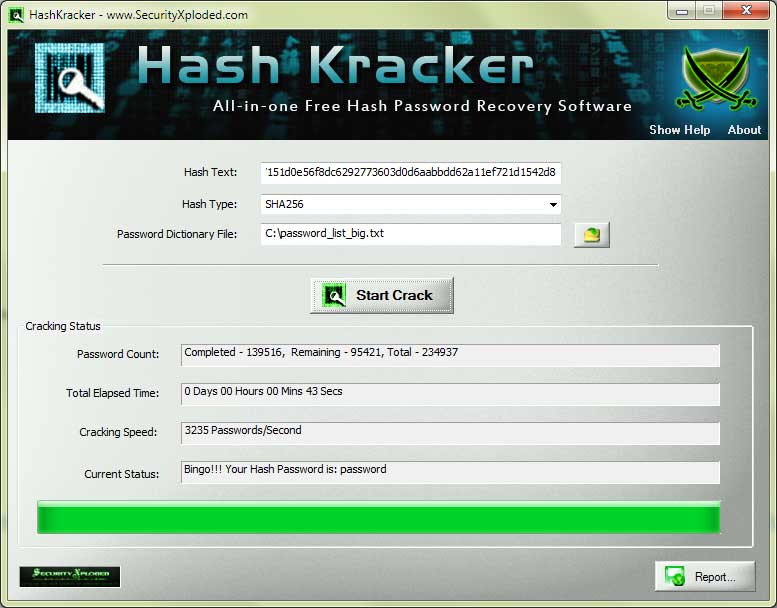
| Screenshot 1: Hash Kracker is showing the recovered Password for SHA256 hash text. | ||||||
 |
||||||
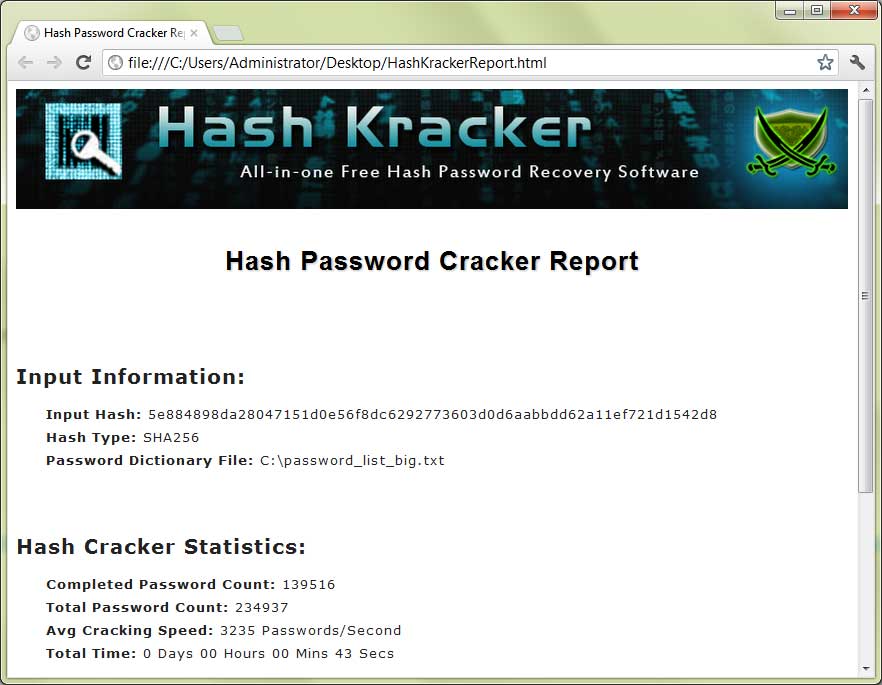
| Screenshot 2: Detailed Hash Password Recovery report generated by HashKracker | ||||||
 |
||||||
| Test Results | ||||||
|
HashKracker is successfully tested on Windows XP to latest operating system, Windows 8. It can recover the hash password successfully for MD5/SHA1/SHA256/SHA384/SHA512 hash data. |
||||||
| Disclaimer | ||||||
|
HashKracker is designed with good
intention to recover the Lost Password. Like any other tool its use either good or bad, depends upon the user who uses it. However neither author nor SecurityXploded is in anyway responsible for damages or impact caused due to misuse of HashKracker. Read our complete 'License & Disclaimer' policy here. |
||||||
| Release History | ||||||
| ||||||
| Download HashKracker | ||||||
|
|

FlashfxpPasswordDecryptor
|
| ||||
| About FlashfxpPasswordDecryptor | ||||
|
||||
|
It presents both GUI as well as command line interface which
will be useful for penetration testers
& Forensic investigators. You can
either use it to automatically recover the stored passwords
from local system or recover passwords from remote machine by
manually feeding FlashFXP "sites.dat" file. FlashfxpPasswordDecryptor works on most of the Windows platforms starting from Windows XP to latest operating system, Windows 7. |
||||
| Features of FlashfxpPasswordDecryptor | ||||
| Here are the highlights of top features of FlashfxpPasswordDecryptor | ||||
|
||||
| Installing FlashfxpPasswordDecryptor | ||||
| FlashfxpPasswordDecryptor comes with Installer so that you can install it locally on your system for regular usage. It has intuitive setup wizard (as shown in the screenshot below) which guides you through series of steps in completion of installation. At any point of time you can use Uninstaller to remove the software from the system. | ||||
 |
||||
| Using FlashfxpPasswordDecryptor | ||||
|
FlashfxpPasswordDecryptor is easy to use with its simple GUI interface. Here are the brief usage details |
||||
| Using GUI Version | ||||
|
||||
| You can also copy the "sites.dat" file from remote machine and manually specify in the application to recover all the stored FTP passwords. | ||||
| Using Command-line Version | ||||
| Here is the typical usage of command line version | ||||
| FlashfxpPasswordDecryptor.exe "<output_file path>" | ||||
| Here are some of the examples | ||||
//Writes recovered password to text file in current directory FlashfxpPasswordDecryptor.exe pass.txt //Writes recovered password to HTML file in current directory FlashfxpPasswordDecryptor.exe pass.html //Writes recovered password to TEXT file FlashfxpPasswordDecryptor.exe "c:\my test\passlist.txt" |
||||
| It automatically detects the mode (text or html) by using the extension of the specified file (txt or html). By default (or if no extension is specified) it uses the TEXT mode. For more examples refer to Screenshot 2 below. | ||||
| Screenshots of FlashfxpPasswordDecryptor | ||||
| Here are the screenshots of FlashfxpPasswordDecryptor | ||||
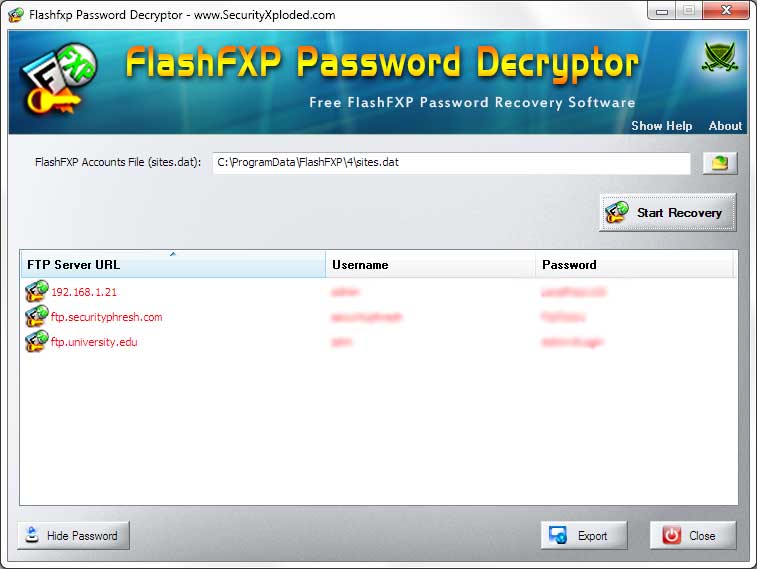
| Screenshot 1:FlashfxpPasswordDecryptor is showing the recovered ftp login passwords. Passwords are not shown being sensitive data, you can turn on by clicking on 'Show Password' button below. | ||||
 | ||||
| Screenshot 2: Command line usage of FlashfxpPasswordDecryptor showing various examples. | ||||
 | ||||
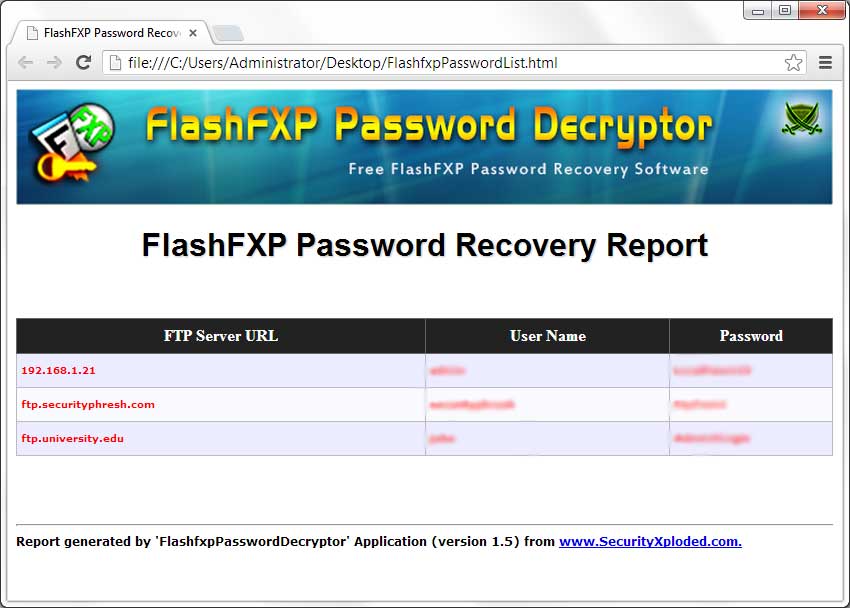
| Screenshot 3: Exported list of of recovered ftp login passwords by FlashfxpPasswordDecryptor in HTML format. | ||||
 |
||||
| Release History | ||||
| ||||
| Disclaimer | ||||
| FlashfxpPasswordDecryptor is not a hacking or cracking tool as it can recover only
your stored passwords. It cannot recover the passwords for other users
unless you have right credentials. Like any tool its use either good or bad, depends upon the user who uses it. However Author or SecurityXploded is not responsible for any damage caused due to misuse of this tool. Read complete License & Disclaimer terms here. |
||||
| Download FlashfxpPasswordDecryptor | ||||
|
||||


Chrome Password Decryptor
BrowserPasswordDecryptor
| About BrowserPasswordDecryptor | ||||||||||||||||
|
Browser Password Decryptor is the FREE software to instantly recover website
login passwords stored by
popular web browsers. All of these web browsers offer the feature store the login passwords so that user don't have to remember and enter the password every time. Each of these use their own local storage format and proprietary encryption mechanism to store the login passwords. BrowserPasswordDecryptor automatically crawls through each of these browsers and instantly recovers all of the stored website login passwords. |
||||||||||||||||
|
It presents both GUI interface as well as command
line version, the later is more helpful for Penetration
testers in their work. Apart from normal users who can use it to
recover their lost password, it can come in handy for Forensic
officials who can get hold of any stored website passwords by various
browsers. It works on most of the Windows platforms starting from Windows XP to latest operating system, Windows 7. |
||||||||||||||||
| Features | ||||||||||||||||
| It supports recovery of website login passwords from following browsers. | ||||||||||||||||
| ||||||||||||||||
| Here are the highlights of top features of BrowserPasswordDecryptor | ||||||||||||||||
|
||||||||||||||||
| Installation & Uninstallation | ||||||||||||||||
| BrowserPasswordDecryptor comes with Installer so that you can install it locally on your system for regular usage. It has intuitive setup wizard (as shown in the screenshot below) which guides you through series of steps in completion of installation. | ||||||||||||||||
| At any point of time, you can uninstall the product using the Uninstaller located at following location (by default) | ||||||||||||||||
| [Windows 32 bit] C:\Program Files\SecurityXploded\BrowserPasswordDecryptor [Windows 64 bit] C:\Program Files (x86)\SecurityXploded\BrowserPasswordDecryptor |
||||||||||||||||
| Using BrowserPasswordDecryptor | ||||||||||||||||
|
BrowserPasswordDecryptor is easy to use with its simple GUI interface. Here are the brief usage details |
||||||||||||||||
| Using GUI Version | ||||||||||||||||
|
||||||||||||||||
| Using Command-line Version | ||||||||||||||||
| Here is the typical usage of command line version | ||||||||||||||||
| BrowserPasswordDecryptor.exe "<output_file path>" | ||||||||||||||||
| Here are some of the examples | ||||||||||||||||
//Writes recovered password to text file in current directory BrowserPasswordDecryptor.exe output.txt //Writes recovered password to HTML file in current directory BrowserPasswordDecryptor.exe output.html //Writes recovered password to XML file in current directory BrowserPasswordDecryptor.exe output.xml //Writes recovered password to TEXT file BrowserPasswordDecryptor.exe "c:\my test\passlist" |
||||||||||||||||
| It automatically detects the mode (HTML/XML/Text) by using the extension of the specified file (html/xml/txt). By default (or if no extension is specified) it uses the TEXT mode. For more examples refer to Screenshot 2 below. | ||||||||||||||||
| Screenshots | ||||||||||||||||
| Here are the screenshots of BrowserPasswordDecryptor | ||||||||||||||||
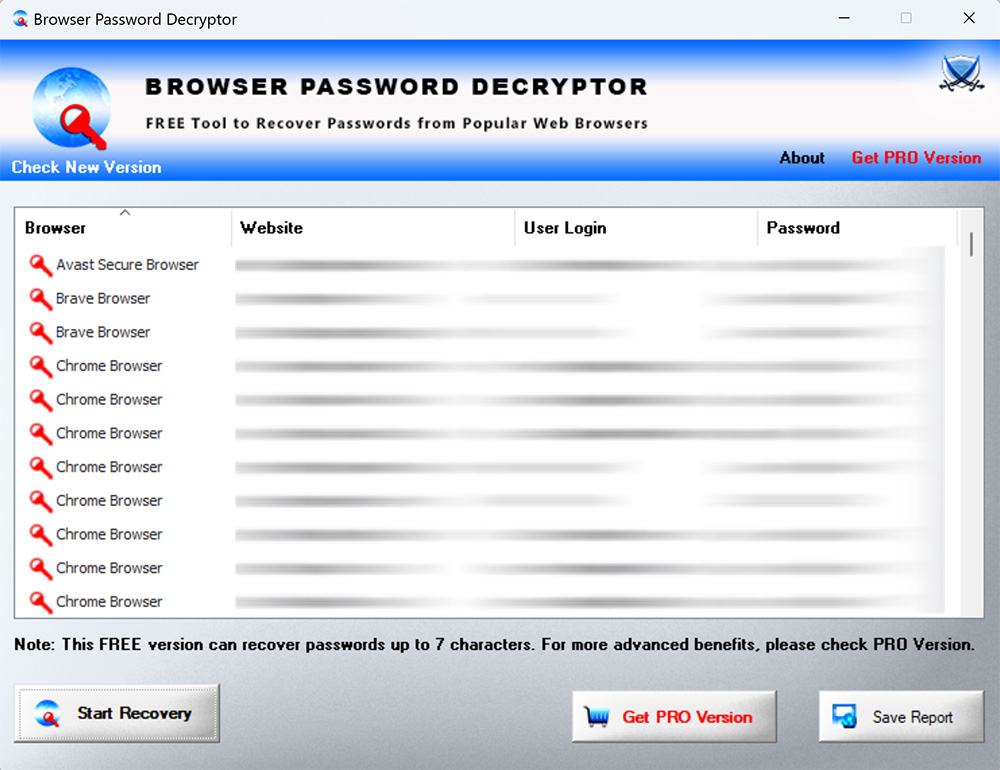
| Screenshot 1:BrowserPasswordDecryptor is showing the recovered website login passwords for popular web browsers. Passwords are not shown being sensitive data, you can turn on by clicking on 'Show Password' button below. | ||||||||||||||||
 | ||||||||||||||||
| Screenshot 2: Command line usage of BrowserPasswordDecryptor showing various examples. | ||||||||||||||||
 | ||||||||||||||||
| Release History | ||||||||||||||||
| ||||||||||||||||
| Disclaimer | ||||||||||||||||
| BrowserPasswordDecryptor is not a hacking tool as it can recover only
your stored passwords. It cannot recover the passwords for other users
unless you have right credentials. Like any tool its use either good or bad, depends upon the user who uses it. However Author or SecurityXploded is not responsible for any damage caused due to misuse of this tool. Read complete License & Disclaimer terms here. |
||||||||||||||||
| Download | ||||||||||||||||
|
AsteriskPasswordSpy
 |
|||||||
| See Also | |||||||
| Contents | |||||||
| About AsteriskPasswordSpy | |||||||
|
|||||||
|
Most applications do not display real password in the login box
for security reasons and instead they show the asterisks (****). But often there is need to know the actual
password especially if you have forgotten password
that you have entered while ago. In such cases, AsteriskPasswordSpy will help you to easily find out the real password hidden behind asterisks. AsteriskPasswordSpy comes with Installer for local installation & un-installation. It works on wide range of platforms starting from Windows XP to latest operating system Windows 7. |
|||||||
| Features | |||||||
| Here are some of the smart features of AsteriskPasswordSpy | |||||||
|
|||||||
| Installation & Uninstallation | |||||||
| AsteriskPasswordSpy comes with Installer so that you can install it locally on your system for regular usage. It has intuitive setup wizard which guides you through series of steps in completion of installation. | |||||||
| At any point of time, you can uninstall the product using the Uninstaller located at following location (by default) | |||||||
| [Windows 32 bit] C:\Program Files\SecurityXploded\AsteriskPasswordSpy [Windows 64 bit] C:\Program Files (x86)\SecurityXploded\AsteriskPasswordSpy |
|||||||
| Using AsteriskPasswordSpy | |||||||
|
AsteriskPasswordSpy is easy to use with its simple GUI interface. Here are the brief usage details |
|||||||
|
|||||||
| Screenshots | |||||||
| Here are the screenshots of AsteriskPasswordSpy | |||||||
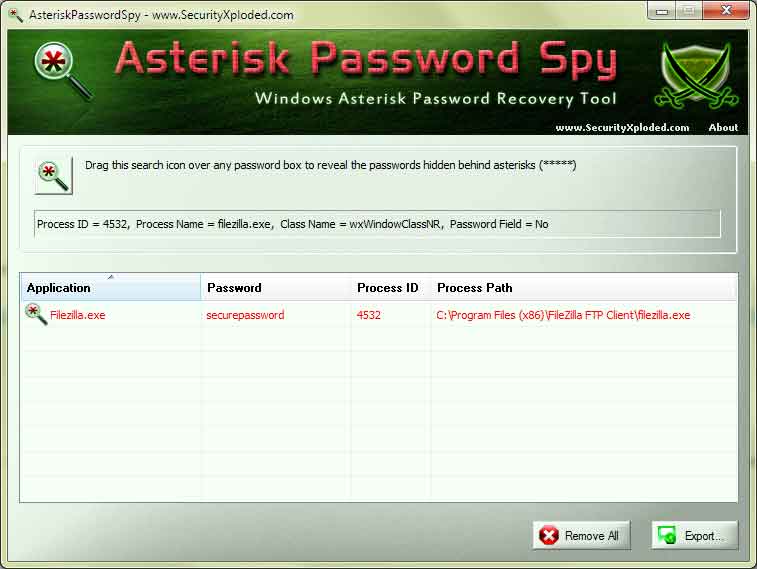
| Screenshot 1:AsteriskPasswordSpy is showing all the recovered passwords from password boxes of various Windows applications. | |||||||
 | |||||||
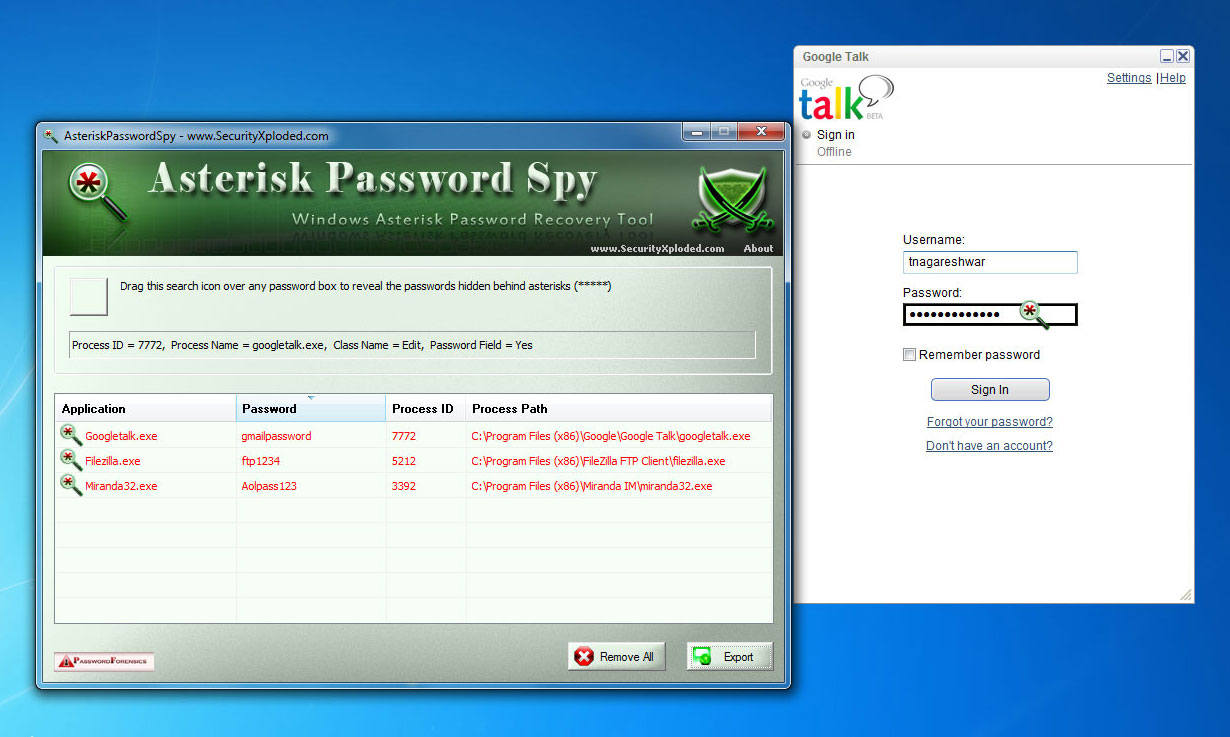
| Screenshot 2: AsteriskPasswordSpy is trying to get the password from Google Talk login box | |||||||
 | |||||||
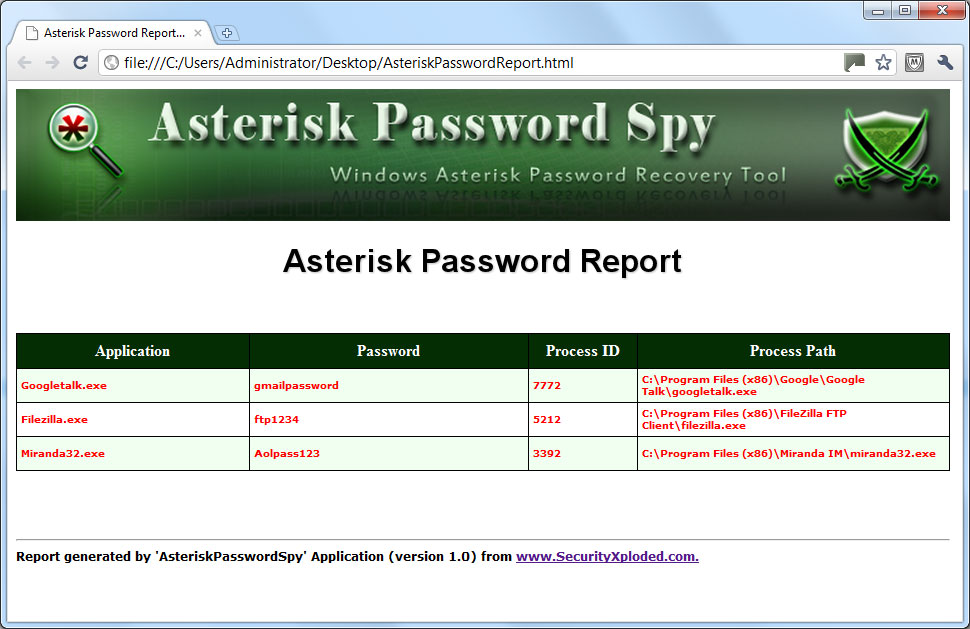
| Screenshot 3: Exported list of of recovered passwords by AsteriskPasswordSpy in HTML format. | |||||||
 |
|||||||
| Known Limitations | |||||||
|
|||||||
| Release History | |||||||
| |||||||
| Acknowledgements | |||||||
| I want to covey my special thanks to authors Brian Friesen of "Password Spy" [Reference 1] & Zhefu Zhang of "Password Spy++" [Reference 2] projects. This tool is based on their impressive work. | |||||||
| Disclaimer | |||||||
| AsteriskPasswordSpy is not a hacking tool as it can recover only
your stored passwords. It cannot recover the passwords for other users
unless you have right credentials. Like any tool its use either good or bad, depends upon the user who uses it. However Author or SecurityXploded is not responsible for any damage caused due to misuse of this tool. Read complete License & Disclaimer terms here. |
|||||||
| Download AsteriskPasswordSpy | |||||||
|
|

AIM Password Decryptor
| About AIM Password Decryptor | |||||||
|
|||||||
|
AIM Password Decryptor helps you to recover all such stored
passwords by AIM. Currently it is the only software which allows you
to recover the passwords from all versions of AIM starting from
6.x to latest version 7.5 It comes with both GUI interface as well as command-line version in the single tool making it useful for both normal users and advanced security professionals such as Penetration Testers & Forensic investigators. It works on most of the Windows platforms starting from Windows XP to latest operating system, Windows 7. |
|||||||
| Main Features | |||||||
| Here are the highlights of main features of AIM Password Decryptor | |||||||
|
|||||||
| Password Secrets of AIM | |||||||
| AIM version 6.x (till v7.2) onwards stores the password at the following registry location, | |||||||
| HKEY_CURRENT_USER\Software\America Online\AIM6\Passwords | |||||||
| AIM PRO version uses the different registry location to store the passwords, | |||||||
| HKEY_CURRENT_USER\Software\AIM\AIMPRO\<Account_Name> | |||||||
| Latest version of AIM (v7.5 since v7.3) stores the encrypted username/password in the file 'aimx.bin' at following location | |||||||
| [Windows XP] C:\Documents and Settings\<user_name>\Local Settings\Application Data\AIM [Windows Vista & Windows 7] C:\Users\<user_name>\AppData\Local\AIM |
|||||||
| AIM uses Blowfish encryption algorithm along with Base64 encoding to securely store the login passwords. We will soon write a detailed research article on exposing the password secrets of AIM. | |||||||
| Installation & Un-installation | |||||||
| AIM Password Decryptor comes with Installer so that you can install it locally on your system for regular usage. It has intuitive setup wizard (as shown in the screenshot below) which guides you through series of steps in completion of installation. | |||||||
| At any point of time, you can uninstall the product using the Uninstaller located at following location (by default) | |||||||
| [Windows 32 bit] C:\Program Files\SecurityXploded\AIMPasswordDecryptor [Windows 64 bit] C:\Program Files (x86)\SecurityXploded\AIMPasswordDecryptor |
|||||||
| Using AIM Password Decryptor | |||||||
|
AIM Password Decryptor is easy to use with its simple GUI interface. Here are the brief usage details |
|||||||
| Using GUI Version | |||||||
|
|||||||
| Using Command-line Version | |||||||
| Here is the typical usage of command line version | |||||||
| AIMPasswordDecryptor.exe "<output_file path>" | |||||||
| Here are some of the examples | |||||||
//Writes recovered password to text file in current directory AIMPasswordDecryptor.exe output.txt //Writes recovered password to HTML file in current directory AIMPasswordDecryptor.exe output.html //Writes recovered password to XML file in current directory AIMPasswordDecryptor.exe output.xml //Writes recovered password to TEXT file AIMPasswordDecryptor.exe "c:\my test\passlist" |
|||||||
| It automatically detects the mode (TEXT/HTML/XML) by using the extension of the specified file (txt or html or xml). By default (or if no extension is specified) it uses the TEXT mode. For more examples refer to Screenshot 2 below. | |||||||
| Screenshots in Action | |||||||
| Here are the screenshots of AIMPasswordDecryptor | |||||||
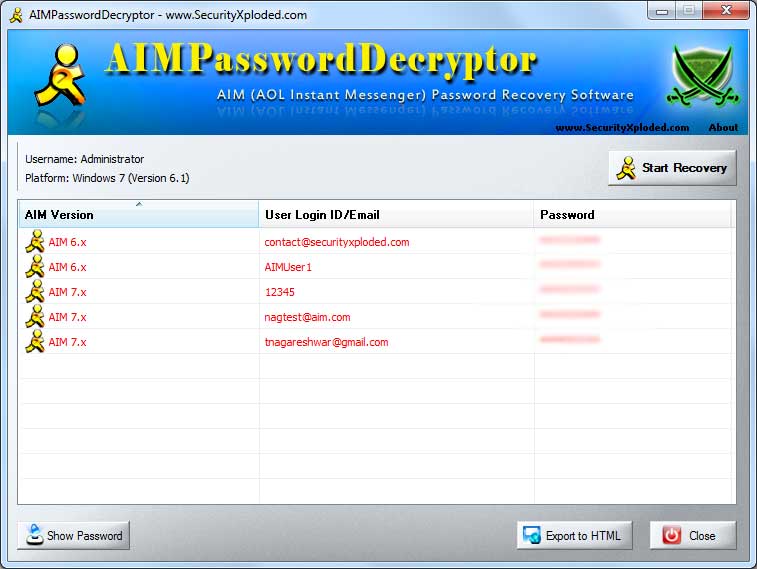
| Screenshot 1:AIMPasswordDecryptor is showing the recovered account passwords from AIM (AOL Instant Messenger). | |||||||
 | |||||||
| Screenshot 2: Command line usage of AIMPasswordDecryptor showing various examples. | |||||||
 | |||||||
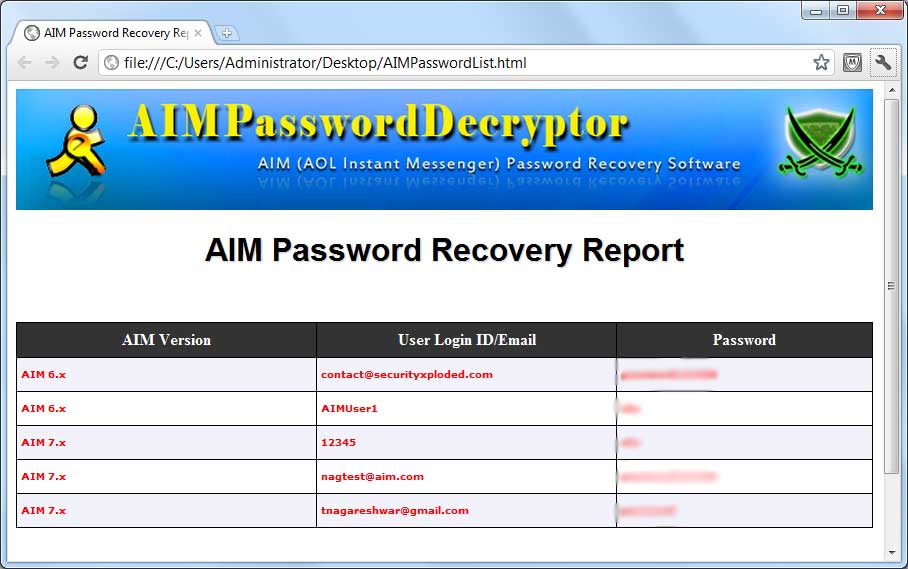
| Screenshot 3: Exported list of of recovered AIM account passwords by AIMPasswordDecryptor in HTML format. | |||||||
 |
|||||||
| Release History | |||||||
| |||||||
| Disclaimer | |||||||
| AIM Password Decryptor is not a hacking or cracking tool as it can
recover only your stored passwords. It cannot recover the passwords for other users
unless you have right credentials. Like any tool its use either good or bad, depends upon the user who uses it. However Author or SecurityXploded is not responsible for any damage caused due to misuse of this tool. Read complete License & Disclaimer terms here. |
|||||||
| Download | |||||||
|

SSLCertScanner
| About SSLCertScanner | |||||||||||||||||||||
|
|||||||||||||||||||||
You can either enter the IP
address or name of the host such as www.facebook.com. Also it
supports both HTTPS (port 443) as well as LDAPS
(port 636) service for scanning SSL certificate. On successful
completion, important certificate details are displayed along with
status of validation. You can also view the
complete details of SSL certificate by simply double clicking on it.
SSLCertScanner is completely portable tool which also comes with Installer to support local installation & uninstallation. It works on wide range of platforms starting from Windows XP to latest operating system Windows 7. |
|||||||||||||||||||||
| Features | |||||||||||||||||||||
| Here are the key features of SSLCertScanner which makes it special and unique. | |||||||||||||||||||||
|
|||||||||||||||||||||
| However it has some limitations such as only single host scanning at
a time, no support for database integration, report generation, no custom port
scanning etc. For more advanced features have a look at our Enterprise Edition - NetCertScanner. |
|||||||||||||||||||||
| Installation & Uninstallation | |||||||||||||||||||||
| Though SSLCertScanner is a Portable tool, it comes with Installer so that you can install it locally on your system for regular usage. It has intuitive setup wizard which guides you through series of steps in completion of installation. | |||||||||||||||||||||
| At any point of time, you can uninstall the product using the Uninstaller located at following location (by default) | |||||||||||||||||||||
| [Windows 32 bit] C:\Program Files\SecurityXploded\SSLCertScanner [Windows 64 bit] C:\Program Files (x86)\SecurityXploded\SSLCertScanner |
|||||||||||||||||||||
| Using SSLCertScanner | |||||||||||||||||||||
| SSLCertScanner is a standalone tool and can be
run directly from any system. Here are brief usage instructions, | |||||||||||||||||||||
|
|||||||||||||||||||||
| Screenshots | |||||||||||||||||||||
| Here are the screenshots which gives glance of SSLCertScanner in action. | |||||||||||||||||||||
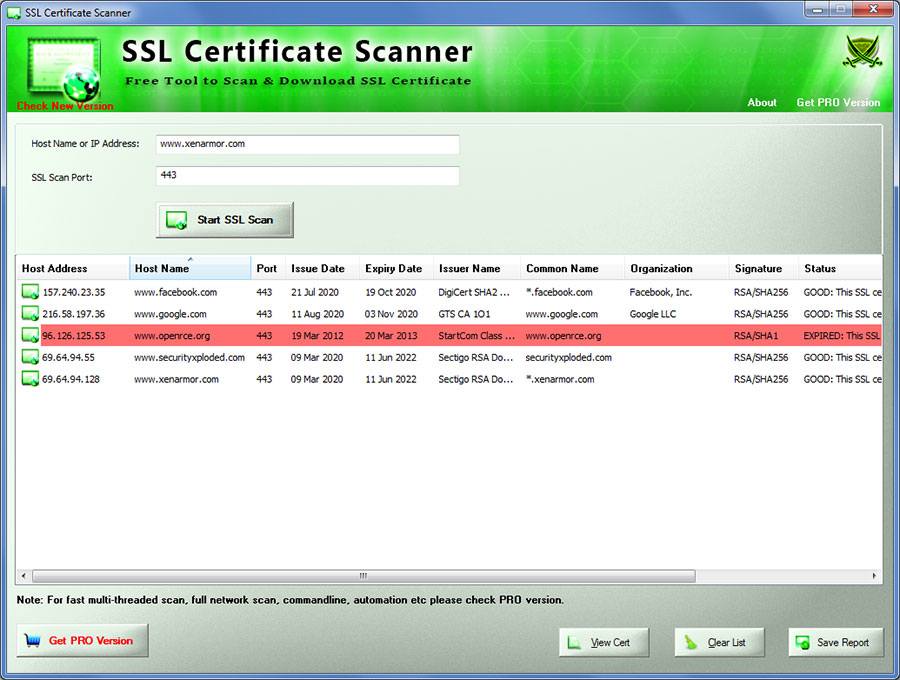
| Screenshot 1: SSLCertScanner showing all the scanned host list along with validation results. | |||||||||||||||||||||
 |
|||||||||||||||||||||
| Screenshot 2: SSLCertScanner showing the SSL certificate for www.Facebook.com | |||||||||||||||||||||
 |
|||||||||||||||||||||
| History | |||||||||||||||||||||
| |||||||||||||||||||||
| Download | |||||||||||||||||||||
|
|||||||||||||||||||||

Safari Password Decryptor
| About | ||||||||||
|
||||||||||
|
Like other browsers, Safari also has built-in
password manager which stores the login passwords for the visited websites
so that user don't have to
enter the password every time. Safari uses its own local storage format and encryption mechanism to
securely store these login passwords. SafariPasswordDecryptor helps
in automatically recovering all such website login passwords stored
by Safari. Safari Password Decryptor presents both GUI interface as well as command line version, the later is more helpful for Penetration testers in their work. Apart from normal users who can use it to recover their lost password, it can come in handy for Forensic officials who can get hold of any stored Website login passwords. It works on most of the Windows platforms starting from Windows XP to latest operating system, Windows 8. |
||||||||||
| Features | ||||||||||
| Here are the top features of SafariPasswordDecryptor | ||||||||||
|
||||||||||
| Internals of Safari Password Secrets | ||||||||||
| Safari Password Manager has a built in password manager for securely storing and managing the user's web login passwords. Safari uses it's own proprietary storage format and encryption mechanism to keep the passwords protected from prying eyes. | ||||||||||
 |
||||||||||
| Here is the research paper - 'Exposing the Password Secrets of Safari' - which exposes Safari stored password location, encryption algorithm and code for decryption of stored passwords ! | ||||||||||
| Installation & Uninstallation | ||||||||||
| It comes with simple Instaler that helps you to install it locally on your system for regular usage. It has intuitive setup wizard which guides you through series of steps in completion of installation. | ||||||||||
| At any point of time, you can uninstall the product using the Uninstaller located at following location (by default) | ||||||||||
| [Windows 32 bit] C:\Program Files\SecurityXploded\SafariPasswordDecryptor [Windows 64 bit] C:\Program Files (x86)\SecurityXploded\SafariPasswordDecryptor |
||||||||||
| How to Use? | ||||||||||
|
SafariPasswordDecryptor is easy to use with its simple GUI interface. Here are the brief usage details |
||||||||||
| Using GUI Version | ||||||||||
|
||||||||||
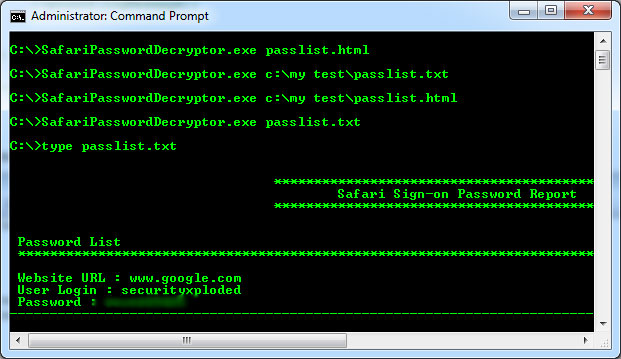
| Using Command-line Version | ||||||||||
| Here is the typical usage of command line version | ||||||||||
| SafariPasswordDecryptor.exe "<output_file path>" | ||||||||||
| Here are some of the examples | ||||||||||
//Writes recovered password to text file in current directory SafariPasswordDecryptor.exe output.txt //Writes recovered password to HTML file in current directory SafariPasswordDecryptor.exe output.html //Writes recovered password to TEXT file SafariPasswordDecryptor.exe "c:\my test\passlist" |
||||||||||
| It automatically detects the mode (text or html) by using the extension of the specified file (txt or html). By default (or if no extension is specified) it uses the TEXT mode. For more examples refer to Screenshot 2 below. | ||||||||||
| Screenshots | ||||||||||
| Here are the screenshots of SafariPasswordDecryptor | ||||||||||
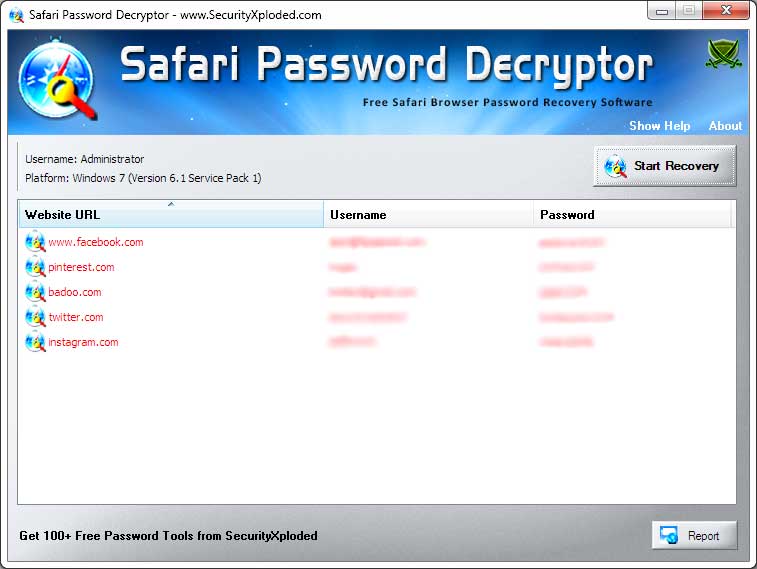
| Screenshot 1:SafariPasswordDecryptor is showing the recovered website login passwords for popular applications. | ||||||||||
 | ||||||||||
| Screenshot 2: Command line usage of SafariPasswordDecryptor showing various examples. | ||||||||||
 | ||||||||||
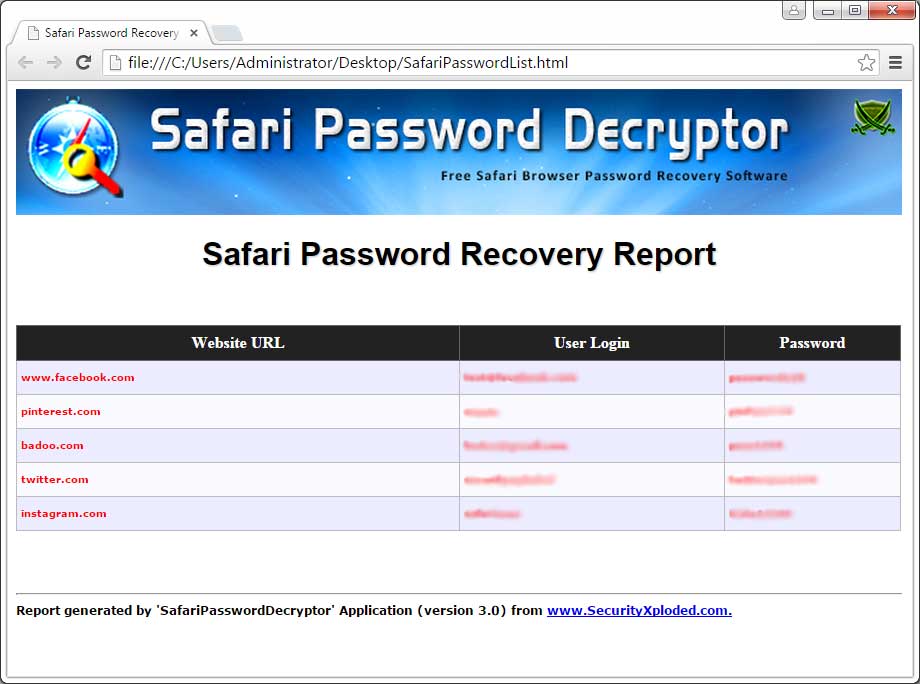
| Screenshot 3: Exported list of of recovered Website login passwords by SafariPasswordDecryptor in HTML format. | ||||||||||
 |
||||||||||
| Release History | ||||||||||
| ||||||||||
| Disclaimer | ||||||||||
| SafariPasswordDecryptor is not a hacking tool as it can recover only
your stored passwords. It cannot recover the passwords for other users
unless you have right credentials. Like any tool its use either good or bad, depends upon the user who uses it. However Author or SecurityXploded is not responsible for any damage caused due to misuse of this tool. Read complete License & Disclaimer terms here. |
||||||||||
| Download | ||||||||||
|
||||||||||


Subscribe to:
Comments (Atom)
Flag Counter


